Getting started with Phaser 3 using Webpack | part 1
Phaser is an HTML5 gaming framework that allows you to build games deployable on the web, desktop and mobiles. As it’s a JavaScript based framework, it allows us, web developers, to be able to digg quickly in games development by using our favorite programming language.
For me, it makes a lot of sense, to be able to code using JavaScript, interact with the DOM, build quickly a NodeJS api, use Socket.io and mainly to be able to quickly import modules from the B.I.G. npm repository. This makes it for me a 1st class candidate, although there are a lot other gaming frameworks.
Starting with this article, I wanted to share my initial experiments with it and the development setup that I started, much more similar towards the web applications I’m building usually in my professional working time.
You need a NodeJS local development environment to get started.
Keep an eye on my blog for a future article on how to setup a non-brain-damage
NodeJS local development environment. // @TODO NodeJS local development
environments for Windows, MacOS and Linux.
Open a terminal or CMD (if on Windows).
If not done yet, create a folder which will be the base of our project.
Change to the folder and run npm init -y. This will initiate a Node project
with defaults. // @TODO NPM init defaults article.
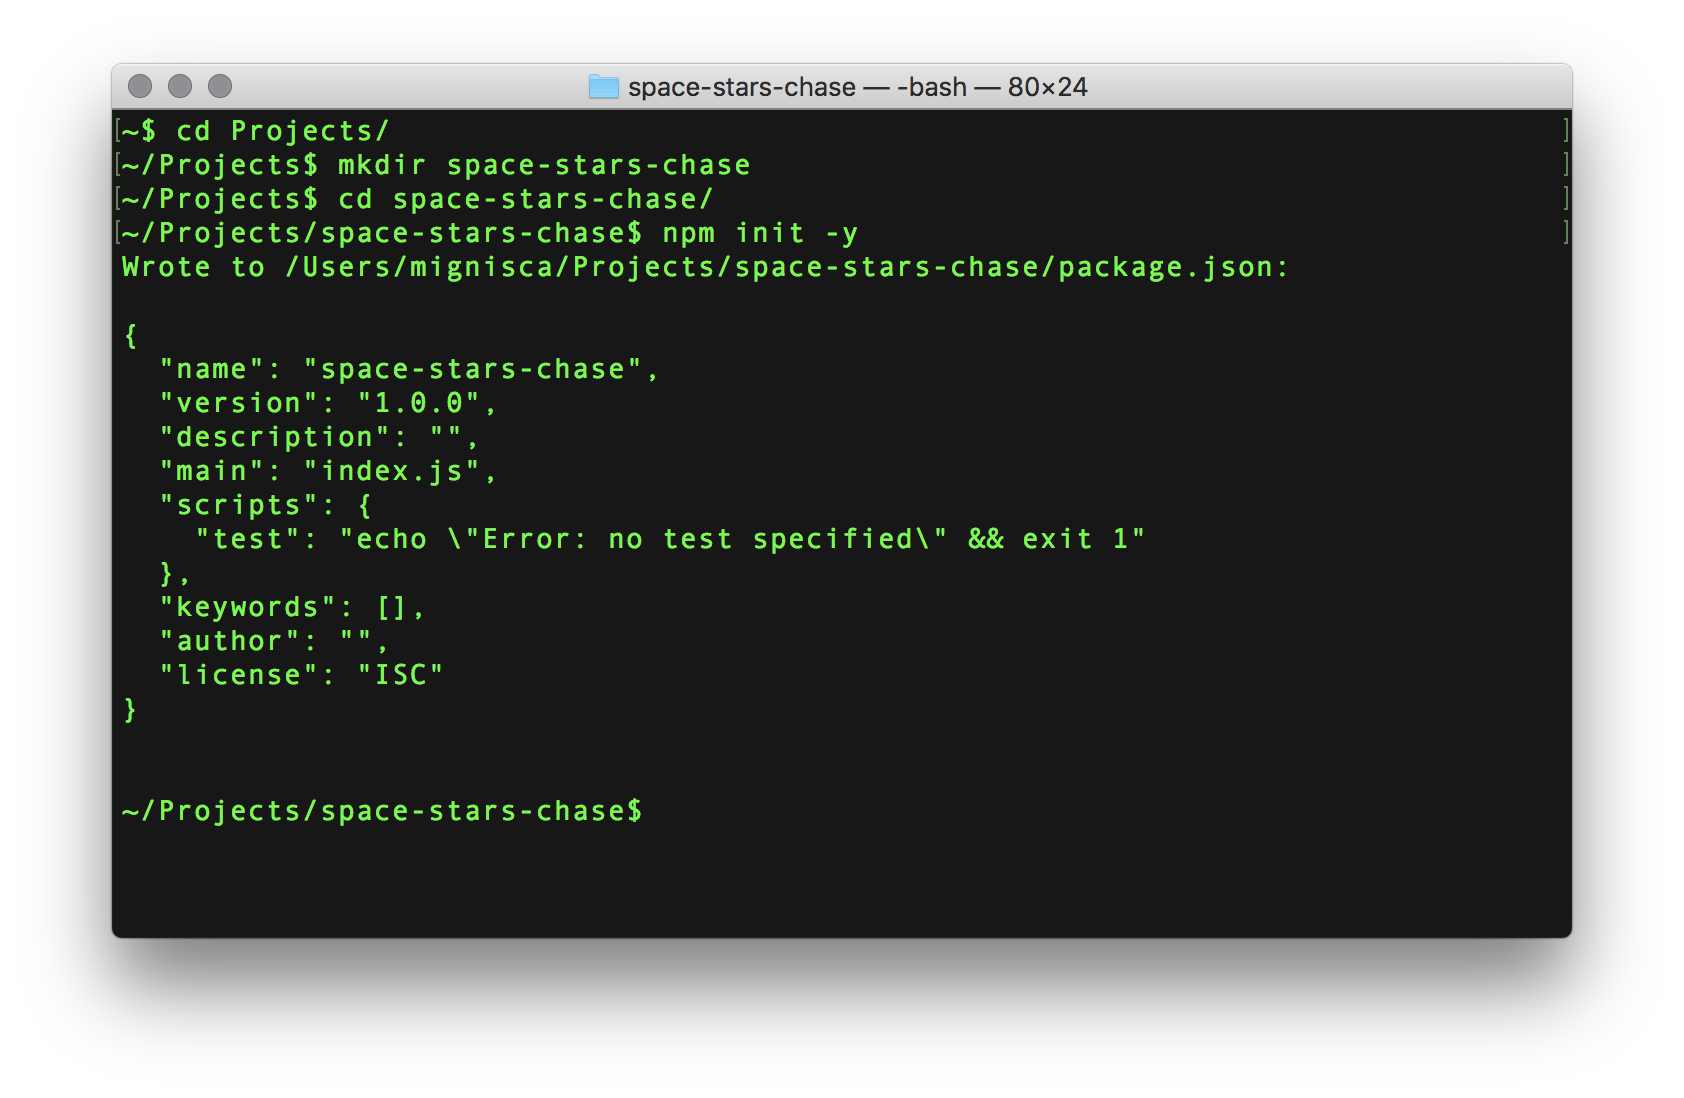
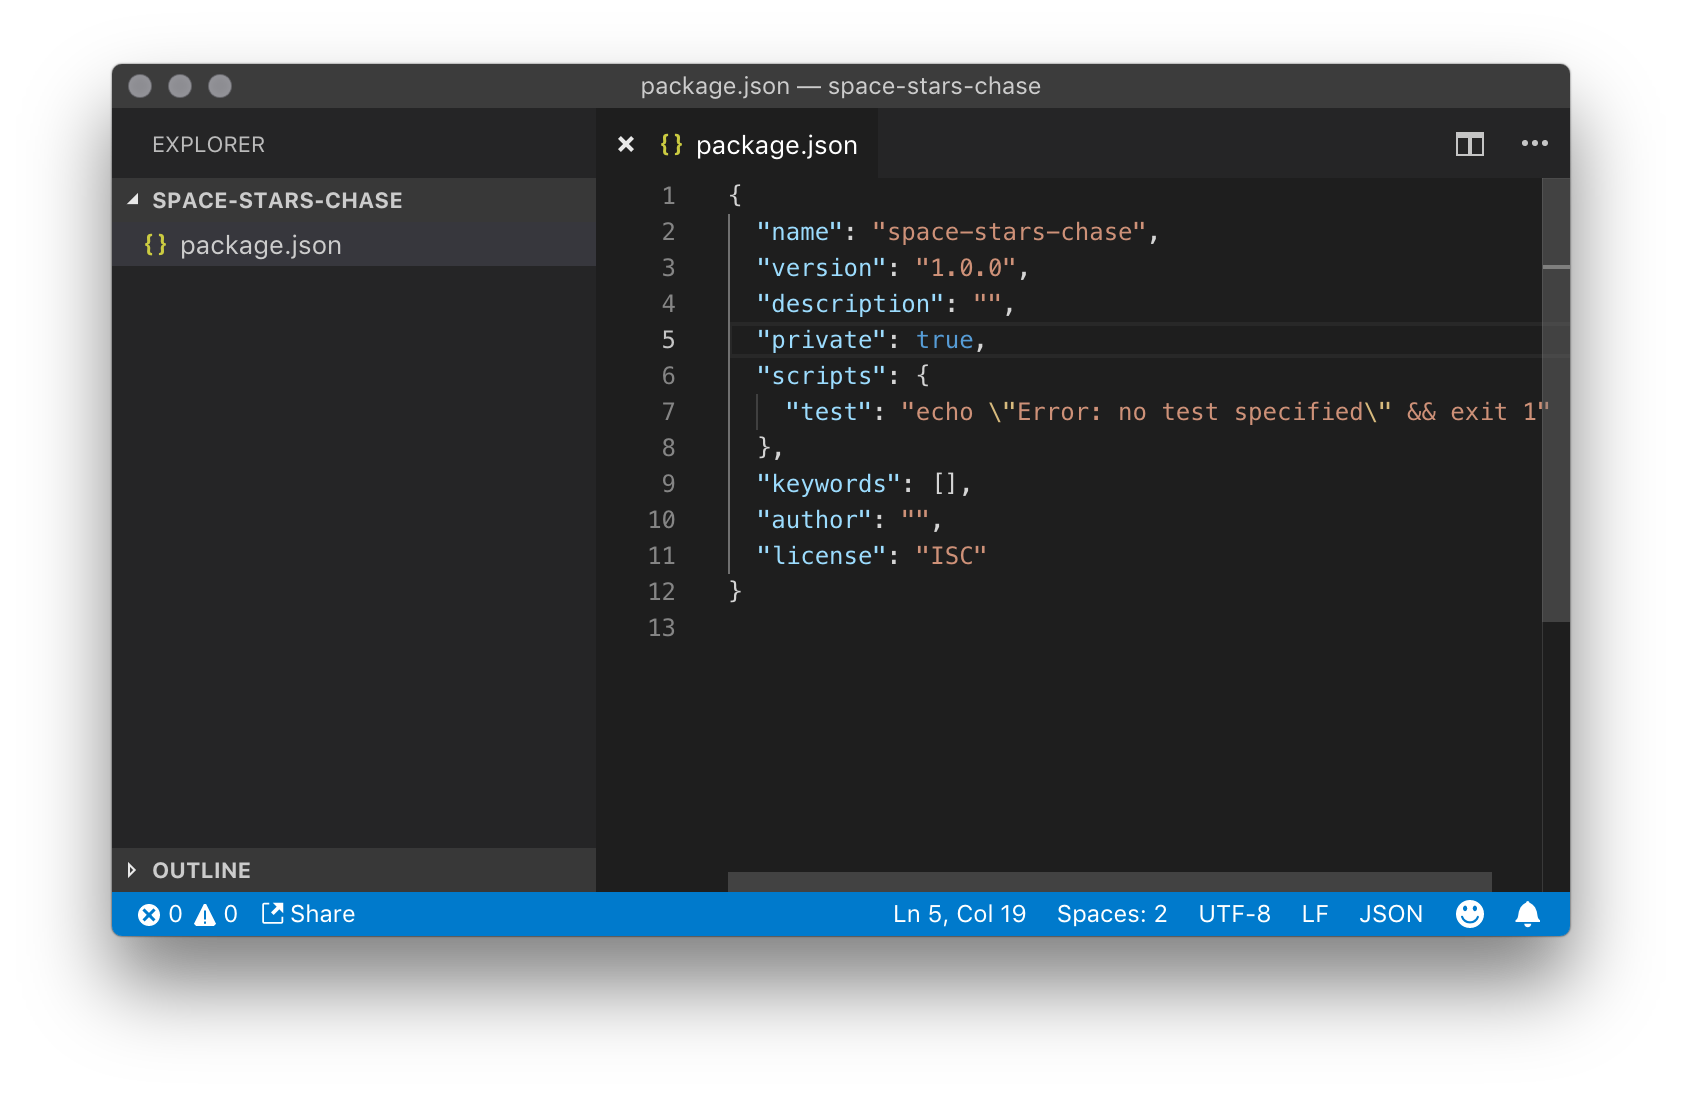
Open the folder in your prefered editor and edit the new package.json file. Remove the line "main": "index.js", and add a new line "private": true,, as this is a project and is not intended as a public node module.
We will install development dependencies step by step as needed and build configuration.
npm install --save-dev webpack webpack-cli
This will install Webpack with the cli wrapper that will help triggering manual builds.
Create a new file webpack.config.js
Let’s put the initial configuration code:
const path = require('path');

module.exports = {
  mode: 'development',
  entry: './src/game.js',
  output: {
    path: path.resolve(__dirname, 'dist'),
    filename: 'game.js'
  }
}
We use the Node’s path internal module to sort out the exact path where to
actually put processed files. Webpack will start with ./src/game.js and it
will transpile and import all dependencies, building up a final optimised file
in dist folder.
Now let’s add the
Clean Webpack Plugin.
This will make sure to delete thedist folder each time a build is done.
npm install --save-dev clean-webpack-plugin
And edit webpack’s configuration:
const path = require('path');
const CleanWebpackPlugin = require('clean-webpack-plugin')

module.exports = {
  mode: 'development',
  entry: './src/game.js',
  output: {
    path: path.resolve(__dirname, 'dist'),
    filename: 'game.js'
  },
  plugins: [
    new CleanWebpackPlugin([
      'dist'
    ])
  ]
}
We also need some main html file generated and we will use Html Webpack Plugin to do that.
npm install --save-dev html-webpack-plugin
Edit webpack’s configuration:
const path = require('path');
const CleanWebpackPlugin = require('clean-webpack-plugin')
const HtmlWebpackPlugin = require('html-webpack-plugin')

module.exports = {
  mode: 'development',
  entry: './src/game.js',
  output: {
    path: path.resolve(__dirname, 'dist'),
    filename: 'game.js'
  },
  plugins: [
    new CleanWebpackPlugin([
      'dist'
    ]),
    new HtmlWebpackPlugin()
  ]
}
Our game will have also additional file assets and we just want to have them minimally processed (as to be copied as necesarry) from the source folder to the distribution folder. Later we will enhance optimisation for them. We will install file-loader, a webpack loader responsible of processing files depending on what rules you setup.
npm install --save-dev file-loader
const path = require('path');
const CleanWebpackPlugin = require('clean-webpack-plugin')
const HtmlWebpackPlugin = require('html-webpack-plugin')

module.exports = {
  mode: 'development',
  entry: './src/game.js',
  output: {
    path: path.resolve(__dirname, 'dist'),
    filename: 'game.js'
  },
  plugins: [
    new CleanWebpackPlugin([
      'dist'
    ]),
    new HtmlWebpackPlugin()
  ],
  module: {
    rules: [{
      test: /\.(png|jpg|gif)$/,
      use: {
        loader: 'file-loader',
        options: {
          outputPath: 'assets'
        }
      }
    }]
  },
}
For our final minimal webpack configuration, we will install and configure the Webpack Dev Server, a plugin that helps while developing to have a web server that automatically reloads the project when we save a file.
npm install --save-dev webpack-dev-server
And alter the configuration which should finally look like this:
const path = require('path');
const CleanWebpackPlugin = require('clean-webpack-plugin');
const HtmlWebpackPlugin = require('html-webpack-plugin');

module.exports = {
  mode: 'development',
  entry: "./src/game.js",
  output: {
    path: path.resolve(__dirname, 'dist'),
    filename: 'game.js'
  },
  plugins: [
    new CleanWebpackPlugin([
      'dist'
    ]),
    new HtmlWebpackPlugin()
  ],
  module: {
    rules: [{
      test: /\.(png|jpg|gif)$/,
      use: {
        loader: 'file-loader',
        options: {
          outputPath: 'assets'
        }
      }
    }]
  },
  devServer: {
    contentBase: path.join(__dirname, 'dist')
  }
};
Let’s alter the package.json npm configuration file to add some run tasks:
{
  "name": "space-stars-chase",
  "version": "1.0.0",
  "description": "",
  "private": true,
  "scripts": {
    "dev": "webpack-dev-server",
    "build": "webpack"
  },
  "keywords": [],
  "author": "Your awesome name and <email@here>",
  "license": "MIT",
  "devDependencies": {
    "clean-webpack-plugin": "^0.1.19",
    "file-loader": "^2.0.0",
    "html-webpack-plugin": "^3.2.0",
    "webpack": "^4.19.1",
    "webpack-cli": "^3.1.1",
    "webpack-dev-server": "^3.1.8"
  }
}
Now, if you’ll exec npm run build, it will do a full build of the project with
final files in the dist folder, and if you exec npm run dev, it will start
a web server, do initial build and watch for changes, compiling/transpiling as
required, autoreloading the browser.
Next, we can add Phaser using npm and start developing.
npm install --save-dev phaser
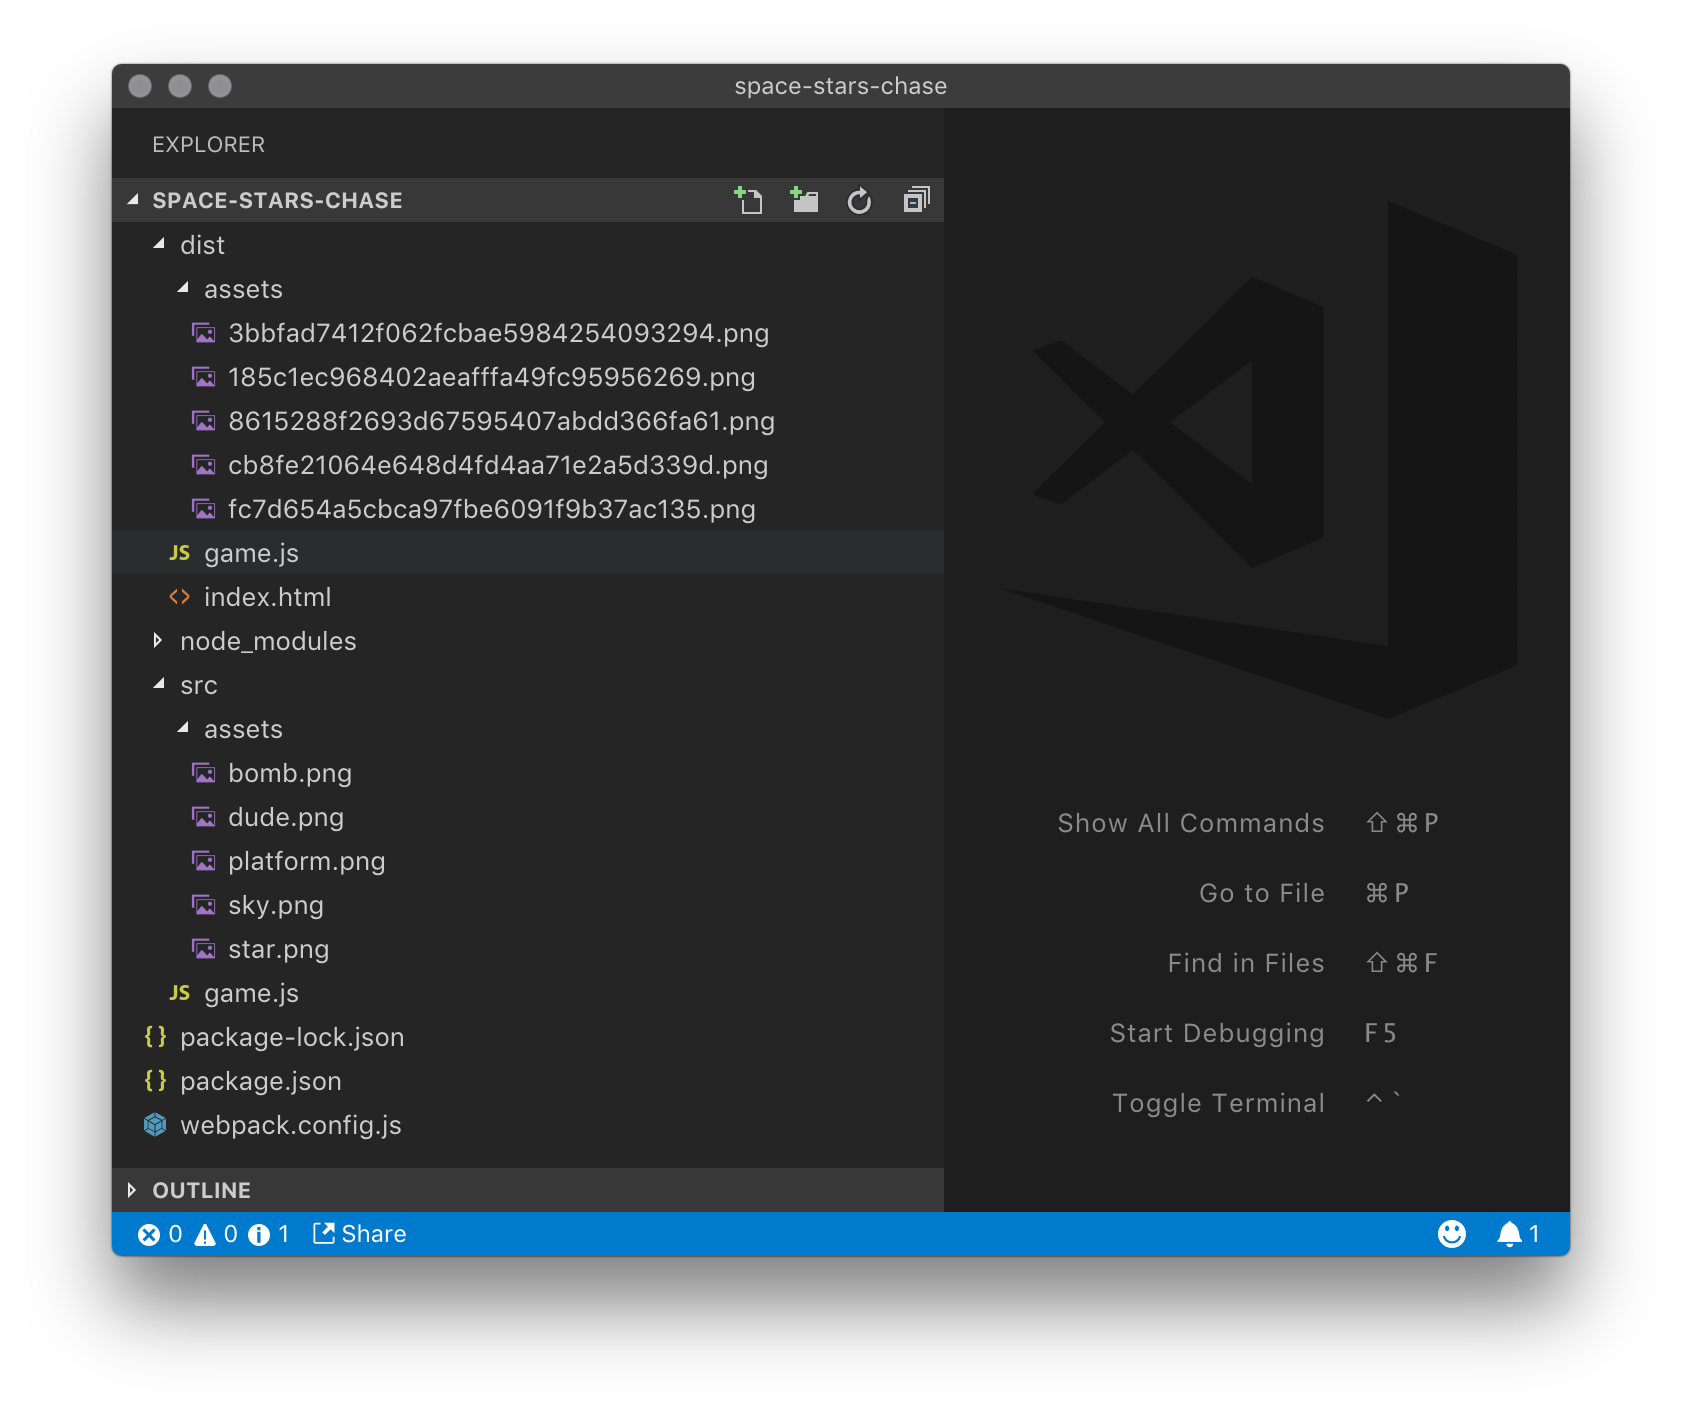
Create the folder src and a new file game.js. Download and unzip in it the
assets
and delete the extra html files. This are the original assets provided by the
official Phaser tutorial.
The final structure should look similar to this:
Paste in the game.js the source of the modified official tutorial and enjoy
the game.
const Phaser = require('phaser');

/* Assets */
const bombAsset = require('./assets/bomb.png');
const dudeAsset = require('./assets/dude.png');
const groundAsset = require('./assets/platform.png');
const skyAsset = require('./assets/sky.png');
const starAsset = require('./assets/star.png');

const config = {
  type: Phaser.AUTO,
  width: 800,
  height: 600,
  scene: {
    preload: preload,
    create: create,
    update: update
  },
  physics: {
    default: 'arcade',
    arcade: {
      gravity: {
        y: 300
      },
      debug: false
    }
  }
}

const game = new Phaser.Game(config);

function preload() {
  this.load.image('sky', skyAsset);
  this.load.image('star', starAsset);
  this.load.image('ground', groundAsset);
  this.load.image('bomb', bombAsset);
  this.load.spritesheet('dude', dudeAsset, {
    frameWidth: 32,
    frameHeight: 48
  })
}

var platforms;
var player;
var cursors;
var stars;
var score = 0;
var scoreText;
var bombs;

function create() {
  this.add.image(400, 300, 'sky');

  platforms = this.physics.add.staticGroup();
  platforms.create(400, 568, 'ground').setScale(2).refreshBody();
  platforms.create(600, 400, 'ground');
  platforms.create(50, 250, 'ground');
  platforms.create(750, 220, 'ground');

  player = this.physics.add.sprite(100, 450, 'dude');
  player.setBounce(0.2);
  player.setCollideWorldBounds(true);

  stars = this.physics.add.group({
    key: 'star',
    repeat: 11,
    setXY: { x: 12, y: 0, stepX: 70 }
  });
  stars.children.iterate(function(child) {
    child.setBounceY(Phaser.Math.FloatBetween(0.4, 0.8));
  });

  bombs = this.physics.add.group();

  scoreText = this.add.text(16, 16, 'score: 0', { fontSize: '32px', fill: '#000' });

  this.anims.create({
    key: 'left',
    frames: this.anims.generateFrameNumbers('dude', { start: 0, end: 3 }),
    frameRate: 10,
    repeat: -1
  });

  this.anims.create({
    key: 'turn',
    frames: [{ key: 'dude', frame: 4 }],
    frameRate: 20
  });

  this.anims.create({
    key: 'right',
    frames: this.anims.generateFrameNumbers('dude', { start: 5, end: 8 }),
    frameRate: 10,
    repeat: -1
  });

  this.physics.add.collider(player, platforms);
  this.physics.add.collider(stars, platforms);
  this.physics.add.collider(bombs, platforms);
  this.physics.add.collider(player, bombs, hitBomb, null, this);

  this.physics.add.overlap(player, stars, collectStar, null, this);

  cursors = this.input.keyboard.createCursorKeys();
}

function update() {
  if (cursors.left.isDown) {
    player.setVelocityX(-160);
    player.anims.play('left', true);
  }
  else if (cursors.right.isDown) {
    player.setVelocityX(160);
    player.anims.play('right', true);
  }
  else {
    player.setVelocityX(0);
    player.anims.play('turn');
  }

  if (cursors.up.isDown && player.body.touching.down) {
    player.setVelocityY(-330);
  }
}

function collectStar(player, star) {
  star.disableBody(true, true);

  score += 10;
  scoreText.setText('score: ' + score);

  if (stars.countActive(true) === 0) {
    stars.children.iterate(function(child) {
      child.enableBody(true, child.x, 0, true, true);
    });

    var x = (player.x < 400) ? Phaser.Math.Between(400, 800) : Phaser.Math.Between(0, 400);

    var bomb = bombs.create(x, 16, 'bomb');
    bomb.setBounce(1);
    bomb.setCollideWorldBounds(true);
    bomb.setVelocity(Phaser.Math.Between(-200, 200), 20);
    bomb.allowGravity = false;
  }
}

function hitBomb(player, bomb) {
  this.physics.pause();

  player.setTint(0xff0000);

  player.anims.play('turn');

  gameOver = true;
}
Run npm run dev and test the game in the browser.
The local url is mentioned by npm once you run the dev command and should output similar like this:
~/Projects/space-stars-chase/src$ npm run dev

> space-stars-chase@1.0.0 dev /Users/mignisca/Projects/space-stars-chase
> webpack-dev-server

clean-webpack-plugin: /Users/mignisca/Projects/space-stars-chase/dist has been removed.
ℹ 「wds」: Project is running at http://localhost:8084/
In the second part I will detail you what is different from the official tutorial and I will continue with spliting up the webpack configuration for production optimised build and development.